It is about Halloween, that date marked on the calendar in which we draw the scariest costumes and decorate the house for the occasion. The pumpkins are the quintessential symbol of Halloween, we can place the many and varied ways, with candles inside, forming garlands … and in any room of our home.
And today I want to show a different and original way to do it: once again, with geometric print as protagonists. Quires know how to do to decorate the night of October 31 as it deserves? Then I’ll tell you everything you need and the steps you need to do for this simple DIY.

The materials you need
Thus, to make this geometric pumpkin following signs that give us from the blog Design Improvised will need:
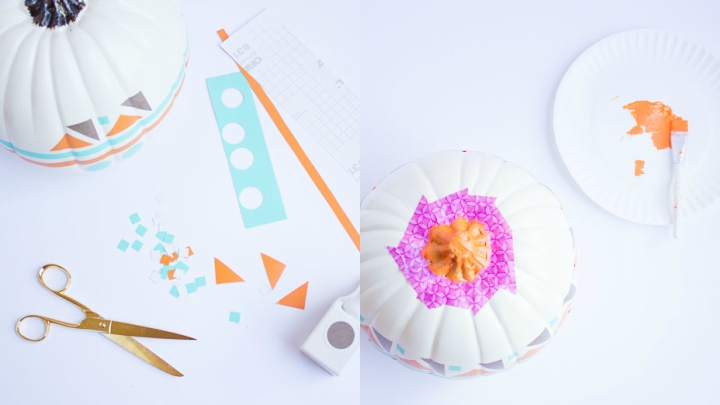
- A white pumpkin. Here is polyurethane foam and have already bought white craft a website, but if you cannot always find this paint another color. The white background will give you many decorative possibilities.
- Clippings vinyl in different colors.
- Scissors.
- A punch (optional, to cut the vinyl in a circle).
- Acrylic paint and (also optional) small brush.
How to make this pumpkin for Halloween
First of all, freestyle. That is to say. The vinyl cuts can make the shapes and sizes that you like, creating squares, triangles, circles … Total freedom for style and colors chosen. You can also cut long strips to place around the pumpkin in the middle. Today we know how to do this but when you put it to work let your imagination fly …
Paste vinyl
The design has begun to take from the front and has worked around the pumpkin. Most of them have a kind of sewing aside, we leave at the back. Make sure the vinyl is smooth and well attached and n the surface of the pumpkin, but at first did not hit too much if you see that you do not like and you need to take off a piece and change site. Here they have used a palette of colors autumn mixing orange with gold and turquoise. Amazing!
You may also like to read another article on RealOrigin: How to make a bright flamingo
The painting
Why do we need painting? If you want, you can give a touch of color to the “little tail” of the pumpkin, in combination with some tone that you have put into vinyl. In this case, it has opted for the orange, the color of Halloween without a doubt, what gives this pumpkin a special touch.

Where to place this geometric pumpkin?
You have made your Halloween pumpkin list! As you can see, it is quite different from the typical oranges with eyes and mouths, and to choose colors for your decor will allow you to combine it with other tones you have in your home. You can put it in the hall, on the coffee table or even in the kitchen. The white base provides a very elegant look.
The use of vinyl
The vinyl adheres well to the surface of the pumpkin and is much easier to paint geometric drawings. This is done with an iron and go cutting small pieces of the ways we want, and stick as if it were a sticker, only with more grip and better finish than these. In addition, it is easy to change your position as you please, so you can reinvent your pumpkin every year and introduce different colors and shapes to renew your Halloween decoration.