
You just unpacked your new appliance, and now reality sinks in: the kitchen counter is cluttered with dirty dishes, the sink is full, and you desperately need a solution. The good news? Installing a portable countertop dishwasher is one of the simplest home upgrades you can do. No plumber required, no permanent modifications, and you can be running a cycle in under twenty minutes. The problem most people face is not knowing what they actually need before they start, leading to frustrating trips to the hardware store or worse, a leak on their new floor. This guide walks you through every step, the tools you’ll need, and the common pitfalls to avoid.
What Exactly Is a Portable Countertop Dishwasher?
A portable countertop dishwasher is a compact, self-contained appliance designed to sit on your kitchen counter. It connects directly to your kitchen faucet using a quick-connect adapter, requires no permanent plumbing, and is ideal for apartments, RVs, small kitchens, or anyone who wants to avoid handwashing dishes.
How Does It Differ from a Full-Size Dishwasher?
Unlike a standard under-counter dishwasher, a countertop model does not require built-in water lines, electrical hardwiring, or a dedicated drain. It plugs into a standard wall outlet and draws water from your faucet. The wastewater then drains back into your sink. This makes it a perfect choice for renters or anyone who wants flexibility.
What Are the Key Components You Need to Know?
Every portable countertop dishwasher includes a water inlet hose, a drain hose, and a faucet adapter kit. Some premium models come with an internal water tank that can be manually filled, bypassing the need for a faucet connection entirely. Understanding these parts is crucial before you start the installation.
Why Size and Weight Matter for Installation
Countertop models typically range from 17 to 22 inches wide and weigh between 20 and 40 pounds. Before installing, verify that your counter space is level, sturdy, and within reach of a power outlet. A sloped or weak counter can cause the appliance to vibrate or shift during operation.
What Tools and Supplies Do You Need Before You Start?
You likely already own most of what you need. The typical installation requires a screwdriver, an adjustable wrench, Teflon tape, a bucket or towel (for potential spills), and the included faucet adapter kit. Most modern kits require no specialized tools at all.
Essential Tools Checklist
- Adjustable wrench or pliers (for tightening faucet connections)
- Flathead and Phillips screwdrivers (for hose clamps)
- Teflon plumber’s tape (to prevent leaks at threaded connections)
- A small bucket or shallow pan (to catch residual water)
- A clean cloth or towel (for drying connections)
What Comes in the Box?
Open your dishwasher box and confirm all parts are present. You should find the main unit, a water inlet hose, a drain hose, a faucet adapter (usually with multiple connection sizes), a hose clamp, and an instruction manual. If any piece is missing, contact the manufacturer before proceeding.
Do You Need a Dedicated Power Outlet?
Yes. Most units require a standard 110V grounded outlet within four feet of the installation spot. Avoid using an extension cord. If your kitchen has GFCI outlets (which most modern kitchens do), you are all set. The dishwasher draws relatively low power, usually under 1000 watts.
How Do You Prepare Your Sink and Faucet for Connection?
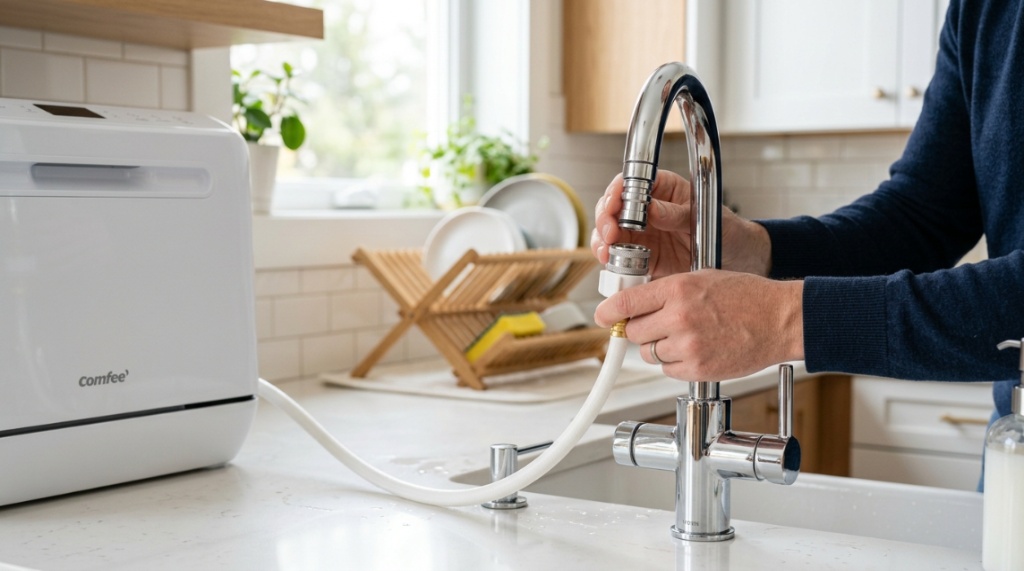
Start by removing any faucet aerator (the small screen at the tip of your spout). Clean the threads, then screw on the provided faucet adapter. This is the most critical step for preventing leaks. Ensure the adapter is hand-tight plus a quarter turn with a wrench.
Step 1: Remove the Aerator Without Damaging It
Most aerators screw off counterclockwise. Use a cloth to protect the finish if you need pliers. Place the aerator in a safe place so you can reinstall it when the dishwasher is not in use. Some adapters include a built-in diverter that lets you switch between regular faucet use and dishwasher use.
Step 2: Install the Faucet Adapter Correctly
Wrap one or two layers of Teflon tape clockwise around the faucet threads. Screw on the adapter until snug. Do not overtighten, as this can crack the plastic threads. Test the connection with the faucet on briefly to ensure no dripping before connecting the hose.
Step 3: Position the Dishwasher for Easy Access
Slide the dishwasher to your desired location on the counter. Make sure the back of the unit is not pressed against the wall, as you need space for the hoses. Leave at least two inches of clearance for proper airflow and hose bending.
How Do You Connect the Inlet and Drain Hoses?
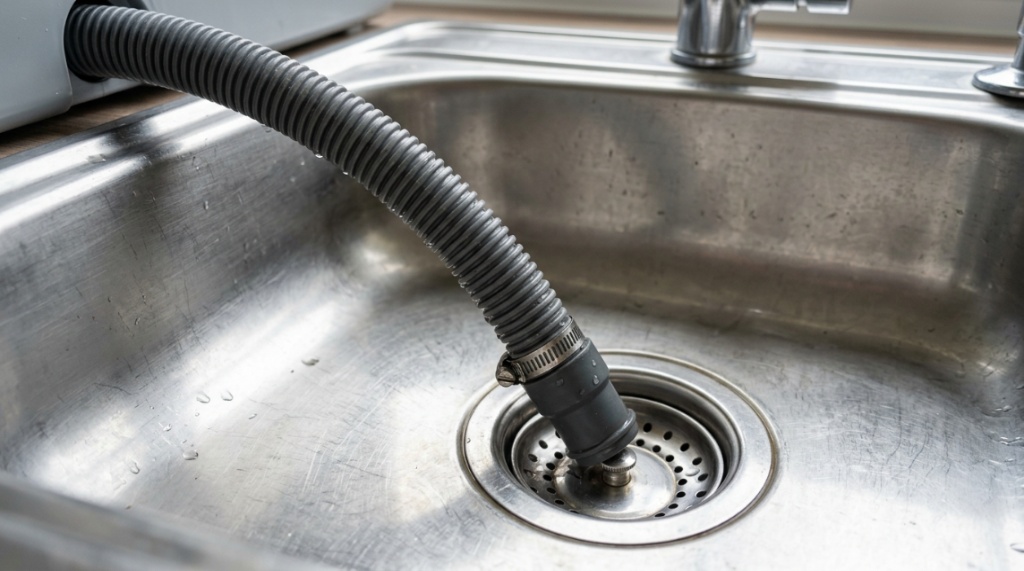
Attach the inlet hose to the faucet adapter by screwing it on hand-tight. Then connect the other end to the dishwasher’s water inlet valve. For the drain hose, connect it to the dishwasher’s drain outlet and place the free end securely into your sink. Ensure the drain hose is not kinked.
Inlet Hose Connection Tips
Most inlet hoses have a rubber gasket inside the fitting. Make sure this gasket is present and seated properly. If your hose seems loose, use a small amount of Teflon tape. Run the faucet briefly to check for drips at both ends of the connection.
Drain Hose Setup for Different Sink Types
If you have a double sink, place the drain hose into the basin that is not being used. For single sinks, the hose can hang over the edge. Use the provided suction cup clip to hold the hose in place. Do not submerge the end of the drain hose in standing water, as this can cause siphoning issues.
How to Secure Hoses to Prevent Accidental Disconnects
Use the hose clamp to secure the drain hose to the dishwasher’s drain spout. A loose drain hose is the number one cause of water on the floor. For the inlet hose, a simple hand-tight connection is usually sufficient, but check it after the first cycle.
Which Faucet Types Work Best with a Portable Countertop Dishwasher?
Most standard kitchen faucets with a removable aerator work perfectly. This includes pull-down, pull-out, and standard gooseneck faucets. Faucets with a sprayer built into the spout or non-threaded faucets may require additional adapters from a hardware store.
Testing Faucet Compatibility Before Installation
Look at the tip of your faucet. If you can unscrew the end, you are almost certainly compatible. If you have a low-end faucet with a permanent non-removable aerator, you may need a universal adapter kit, which includes a rubber compression fitting that clamps onto the outside of the spout.
What If You Have a Motion-Sensor or Touchless Faucet?
Touchless faucets that turn on automatically when you wave your hand can be tricky. The dishwasher needs constant water pressure. Some users report that the faucet shuts off mid-fill. A workaround is to use a bypass clip or manual override mode if your faucet supports it. Check your faucet manual first.
When to Use the Manual Fill Option
Some portable countertop dishwasher models come with a built-in water tank. If your faucet is incompatible or you prefer not to attach anything to it, simply fill the tank manually with a pitcher. This adds a few minutes to the setup but works with any kitchen.
How Do You Test for Leaks Before Running a Full Cycle?
Before loading any dishes, run a short rinse cycle with the dishwasher empty. Watch the faucet adapter, the hose connections, and the bottom of the unit carefully. A small drip can become a flood if left unchecked. Keep a towel nearby to catch any initial drips.
The Two-Minute Leak Test
Turn on the faucet to full pressure. Let the water run for two minutes while the dishwasher fills. Inspect every connection point. Tighten any that show moisture. If a connection continues to leak, disassemble it, reapply Teflon tape, and reassemble more carefully. If you are upgrading your cooking space or doing a complete renovation, proper appliance placement is essential—especially when learning to build a budget kitchen while accommodating compact appliances like countertop dishwashers.
What to Do If You See a Persistent Leak
First, check that the rubber gasket inside the adapter or hose is present and not damaged. Next, ensure the faucet threads are clean and free of old tape. If the leak is between the adapter and the faucet spout, the adapter may be the wrong size. Universal kits often include multiple rubber washers for different thread sizes.
Checking the Drain Path
Ensure the drain hose is not kinked and that the end is secured in the sink. Run the dishwasher briefly and watch the water flow out. If water backs up or drains slowly, the hose may be pinched behind the dishwasher. Adjust the unit’s position until flow is smooth.
Can You Use the Faucet While the Dishwasher Is Running?
Generally, no. When the dishwasher is connected and running, the faucet’s water supply is diverted to the unit. Turning on the faucet can interrupt the dishwasher’s fill cycle or cause low water pressure. Some adapters include a convenient diverter valve that lets you use the faucet normally, but this is not standard on all models.
Understanding Diverter Valves
If your adapter has a small lever or button, that is the diverter. In one position, water flows to the dishwasher. In the other, water flows out the faucet normally. Always switch the diverter back to the faucet position after the dishwasher completes its cycle.
What Happens If You Forget to Switch the Diverter?
It is not dangerous, but the dishwasher will not fill properly. Most units will error out and stop the cycle. Simply switch the diverter back and restart. Over time, forgetting this step can empty your hot water supply, but it won’t damage the machine.
How Do You Level the Dishwasher for Proper Operation?
Place a small bubble level on the top of the dishwasher. Adjust the tiny feet on the bottom corners until the bubble sits centered. A level dishwasher ensures water covers all dishes evenly and prevents pooling in one corner, which can lead to poor cleaning results.
Why Leveling Matters More Than You Think
An unlevel dishwasher can cause the door to close improperly, leading to leaks. It can also cause the machine to vibrate loudly or walk across the counter during the wash cycle. Check leveling both front-to-back and side-to-side.
How to Adjust the Feet on Most Models
Most units have screw-type feet at each corner. Turn them clockwise to raise the unit and counterclockwise to lower it. Use a screwdriver or your fingers. If your counter is uneven, you may need a small shim (like a rubber coaster) under one foot.
What Is the Recommended First Wash Procedure?
Run a complete cycle with only a cup of white vinegar placed on the top rack. This cleans out any manufacturing residues, lubricates the pump, and verifies that all systems work correctly. Do not load dishes on the first run. This is your system validation test.
Choosing the Right Detergent for First Use
After the vinegar cycle, your machine is ready. Use a quality dishwasher detergent tab or powder. Avoid using too much detergent. Countertop dishwashers use less water than full-size models, so a half tablespoon of powder or a half tab is often sufficient to prevent oversudsing.
What to Do If the Machine Makes Unusual Noises
Some noise is normal, especially during the drain and spray phases. If you hear a loud grinding or rattling, stop the cycle. Check that no utensils or packaging materials are loose inside. If noise persists, consult your manual or manufacturer support.
Conclusion
Installing a portable countertop dishwasher is a simple weekend project that delivers massive convenience. You save time, save water, and eliminate the drudgery of handwashing. The process boils down to four steps: prepare the faucet, connect the hoses, test for leaks, and run a cleanout cycle. Most installations take under thirty minutes. Do not let the fear of plumbing hold you back. You are completely capable of doing this yourself. If you run into a compatibility issue with your faucet, remember that universal adapters and manual-fill models solve nearly every problem. Measure your counter space, check your faucet type, and proceed with confidence. Your hands will thank you.
Frequently Asked Questions
Can I install a portable countertop dishwasher myself without a plumber?
Yes. The entire process requires only basic hand tools and no permanent plumbing changes. The connection is temporary and attaches directly to your kitchen faucet.
What happens if my faucet does not have a removable aerator?
You can purchase a universal faucet adapter kit that includes a rubber compression fitting. This clamps onto the outside of your faucet spout and provides a threaded connection for the hose.
How much counter space do I need for a countertop dishwasher?
Most models need about 18 to 24 inches of width and 18 inches of depth. Measure your counter before purchasing. The unit should sit on a flat, stable surface near both a sink and a power outlet.
Will a portable dishwasher work with a tankless water heater?
Yes, but it may take slightly longer for hot water to reach the machine. Run the faucet until the water is hot before connecting the dishwasher. This ensures the first fill uses hot water.
Is it safe to leave the hoses connected when not in use?
Yes, it is generally safe. However, many users disconnect the adapter from the faucet to restore full use of their sink. The hoses can remain attached to the dishwasher. Just store the unit away from direct sunlight and heat.
What size dishes fit in a portable countertop dishwasher?
These units accommodate plates up to 10 inches in diameter, standard cups, glasses, and utensils. Large baking sheets and tall pots generally do not fit. Check your manual for specific rack dimensions.
Do I need a water softener for a portable dishwasher?
Not usually. Most detergents include built-in rinse aids and softeners. If you have extremely hard water, adding a rinse aid will prevent spots and buildup. Otherwise, the machine handles normal tap water without issue.