Why Clean Edges Matter in Every Paint Job
A fresh coat of paint can transform a room. However, nothing ruins that feeling faster than bleed lines and smeared edges. Paint that seeps under the tape leaves uneven borders that look unprofessional. The good news is that getting crisp, clean edges is not as hard as it seems.
With the right preparation, the right tape, and a few smart habits, anyone can achieve sharp lines. You do not need to be a professional painter. You just need to know the steps and follow them carefully. This guide walks you through everything, from choosing your tape to peeling it off without damage.
Choosing the Right Tape for the Job
Not all painter’s tape is the same. The type you choose can make or break your paint line. Therefore, it is important to understand your options before you start.
Standard blue painter’s tape works well for most interior walls. It sticks firmly but removes cleanly. However, for surfaces like wood trim, glass, or freshly painted walls, you may need a tape with lower adhesion. Low-tack tape reduces the risk of pulling off existing paint when you remove it.
For textured surfaces like brick or rough plaster, use a tape with higher flexibility. This allows it to conform to uneven surfaces and seal better. A poor seal is the main reason paint bleeds under the tape.
Additionally, pay attention to the tape’s labeled “clean removal” window. Most tapes should be removed within 14 days. Leaving tape on longer makes it harder to peel and more likely to damage the surface beneath.
Here are the main tape types and their best uses:
- Blue painter’s tape — standard walls and ceilings
- Green Frog tape — fine lines and delicate surfaces
- Yellow contractor’s tape — outdoor use and rough surfaces
- Purple delicate surface tape — freshly painted or wallpapered walls
Preparing the Surface Before You Apply Tape
Surface preparation is the step most people skip. However, it is one of the most important parts of getting a clean edge. Dust, grease, and moisture all prevent tape from adhering properly. When the tape does not stick well, paint seeps underneath.
Start by wiping down the surface with a clean, damp cloth. Let it dry completely before applying any tape. If you are taping near baseboards or trim, check for any loose paint or caulk. Scrape away anything that is flaking. Smooth surfaces give the tape a better seal.
If you are painting near areas with a lot of texture, consider applying a thin layer of clear caulk along the tape edge before painting. This fills any tiny gaps between the tape and the wall. Once the caulk dries, paint over it. The result is a near-perfect line with no bleed.
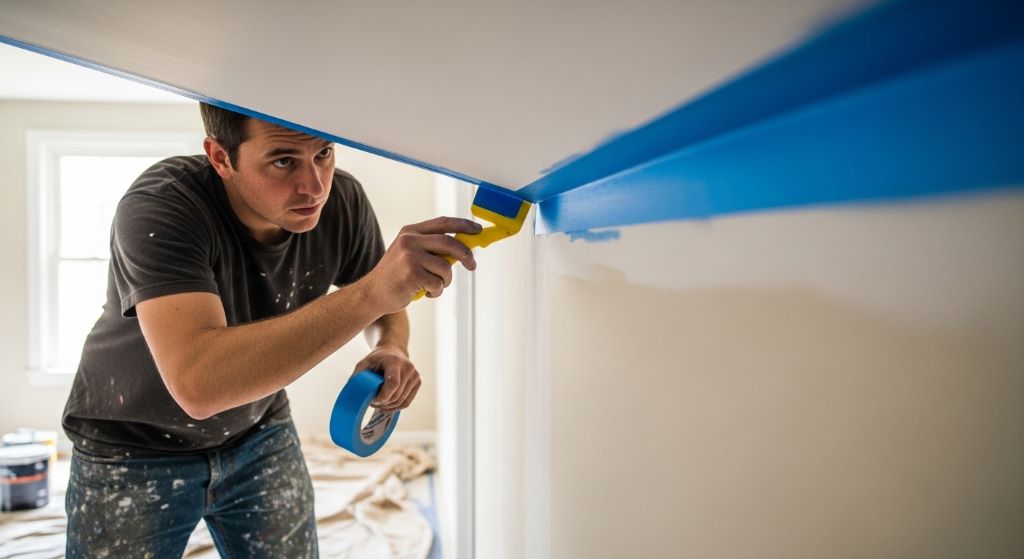
How to Apply Tape the Right Way
Applying tape sounds simple. In practice, however, most people do it too quickly. Rushing this step leads to lifted edges, uneven lines, and paint bleed.
First, measure and cut your tape into manageable lengths. Long strips are harder to control. Shorter pieces — around 12 to 18 inches — give you more accuracy. Start at a corner or a fixed reference point.
Press the tape down with your fingers first, then go back and run your fingernail or a putty knife along the edge. This seals the tape firmly to the surface. Pay special attention to corners and curves. These are the spots where tape tends to lift and let paint through.
When taping along a ceiling or baseboard, keep your eye level with the tape as you apply it. This helps you see if it is running straight. A slight angle can cause a wavy line that is very noticeable once the paint dries.
Additionally, overlap pieces of tape slightly when you turn a corner. This prevents gaps at the joint where paint could sneak through.
The Sealing Trick That Changes Everything
Here is one of the most effective edge painting tricks professionals use. Before you apply your main color, paint the edge of the tape with the same color that is already on the wall — or with a clear primer. Let it dry.
This might seem counterintuitive. However, what you are doing is sealing the tape’s edge with a paint that, if it bleeds, blends into the existing color. Then, when you apply your new paint, it has nowhere to sneak under the tape because the gap is already filled.
This technique works especially well on textured walls. The first coat of matching paint fills in all the tiny pores and crevices. Your actual paint color then sits neatly on top without bleeding.
Painting Technique for Sharp Lines
Your brush and how you use it matter just as much as the tape itself. Therefore, do not ignore painting technique once the tape is on.
Use a high-quality angled brush for edging. Cheap brushes shed bristles and hold less paint, which leads to uneven strokes. Load the brush with a moderate amount of paint — not too much, not too little. Too much paint causes drips and pushes paint under the tape edge.
Paint away from the tape, not toward it. Start your stroke on the tape side, then pull the brush inward toward the open wall. This motion pushes paint away from the edge rather than forcing it underneath.
Work in short, controlled strokes. Do not rush. Let the first coat dry before applying a second one. Additional coats on a wet first coat increase the chance of bleed and dripping.
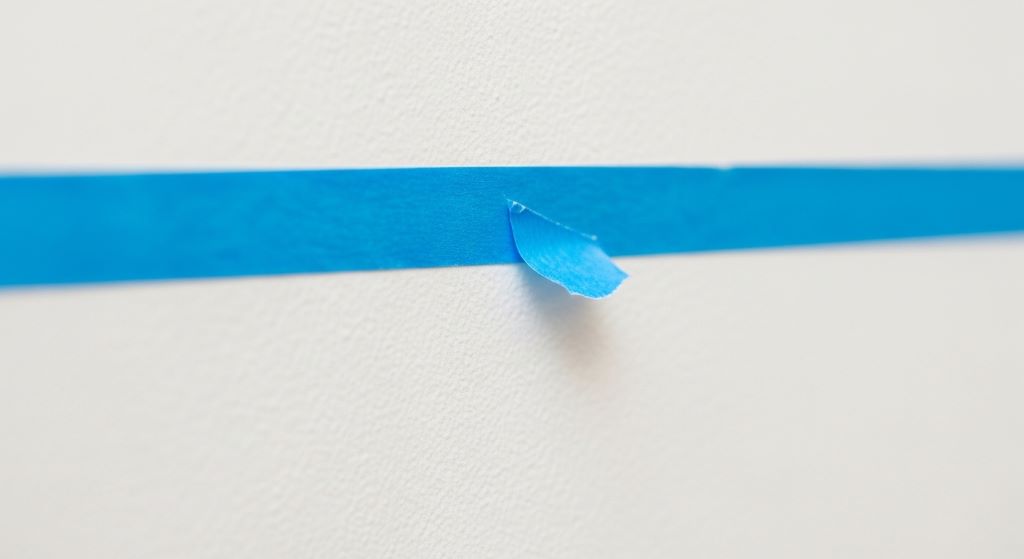
How to Remove Tape Without Ruining Your Work
Timing is everything when it comes to removing tape. Pull it off too early, and the paint may smear. Wait too long, and the tape bonds to the wall and peels off paint with it.
The best time to remove tape is when the paint is still slightly tacky — not wet, not fully dry. This is usually 30 to 60 minutes after your final coat, depending on the paint type and room temperature.
Before pulling, score along the edge of the tape with a utility knife or razor blade. This breaks the paint film cleanly. Without this step, the paint film stretches and tears, leaving a jagged edge.
Pull the tape back at a 45-degree angle. Do it slowly and steadily. Avoid pulling straight back or at a sharp angle. A slow, consistent pull minimizes the risk of damage to the wall or the new paint.
If any tape residue remains, remove it with a small amount of rubbing alcohol on a cloth. Gently dab — do not scrub — to avoid dulling the paint surface.
Fixing Bleed Lines If They Happen
Even with the best preparation, small bleeds can still occur. Do not worry. They are easy to fix if you catch them early.
Wait until the paint is fully dry before attempting a repair. Use a small artist’s brush loaded with the correct wall color to touch up any spots. Work carefully and use thin coats. One thin coat is better than one heavy one.
For larger bleed areas, you may need to sand lightly before repainting. Use 220-grit sandpaper and work in gentle circular motions. Wipe away dust before applying fresh paint.
Additionally, if you notice the bleed while the paint is still wet, use a damp cloth or cotton swab to wipe it away immediately. Act quickly. Once paint dries, removal becomes much harder.
Special Situations: Curves, Corners, and Tricky Spots
Straight lines are one thing. Curved or irregular surfaces are another. These areas need extra attention and sometimes different tools.
For curved surfaces like arches or rounded furniture, use a flexible tape. Some tapes are designed specifically for curves. You can also cut small slits into regular tape to help it bend around curves without lifting.
Inside corners can be tricky because two painted surfaces meet at an angle. Tape both sides carefully and paint one wall at a time. Let the first wall dry fully before taping and painting the second. This prevents overlap and gives you a cleaner joint.
For high areas like where the wall meets the ceiling, use an edging pad or a steady-handed brush instead of relying only on tape. An edging pad glides along the ceiling line and leaves a consistent edge with very little mess.
Tools That Make Edge Painting Easier
Beyond tape, a few simple tools make the job go smoother.
A tape applicator gun speeds up application and keeps the tape straight. It is especially helpful when taping long stretches of baseboard or crown molding. However, for smaller projects, it is not strictly necessary.
A good drop cloth protects your floors and furniture from drips. Plastic sheeting works for floors, but fabric drop cloths are better — they do not slip and they absorb splatter rather than letting it spread.
A corner roller or a small foam roller helps you get into tight angles where a brush might leave brush marks. These are inexpensive and widely available at any hardware store.
No bleed tape products are another option worth exploring. These tapes have a built-in seal along the edge that activates when wet paint touches it. They are more expensive than standard tape but reduce the risk of bleed significantly on smooth surfaces.
Conclusion
Getting clean, sharp edges when painting is completely achievable. The key is to slow down and do each step properly. Choose the right tape for your surface. Prepare the surface before you apply anything. Seal the tape edge with a base coat before painting your final color. Use proper brush technique and remove the tape at the right time.
These edge painting tricks take a little patience. However, the results are worth it. A well-taped edge makes the whole room look professional. No bleed tape techniques, when combined with careful preparation, give you lines that look crisp and intentional.
Whether you are a first-time DIY painter or someone who has done it many times, these steps will improve your results. Take your time, follow the process, and enjoy the transformation.
Frequently Asked Questions
What type of tape works best to prevent paint bleed on textured walls?
Frog tape or any tape with a PaintBlock technology edge works best on textured walls. Additionally, sealing the tape edge with a coat of your base wall color before painting your main color helps fill in texture gaps and prevents bleed.
How long should I leave painter’s tape on before removing it?
Remove painter’s tape when the paint is slightly tacky, typically 30 to 60 minutes after the final coat. Leaving it on too long causes the tape to bond with the paint, which can pull off chunks when removed.
Can I reuse painter’s tape for multiple coats?
No. You should always use fresh tape for each new section. Reused tape loses its adhesive quality and is far more likely to lift away from the surface, allowing paint to seep underneath.
Why does paint bleed even when I use good tape?
Paint usually bleeds because the tape edge was not sealed properly. Common causes include dusty or damp surfaces, insufficient pressure when applying the tape, or using too much paint in each stroke. Sealing the tape with a base coat first solves most bleed problems.
Is there a way to fix a bleed line after the paint has dried?
Yes. Once the paint is fully dry, lightly sand the bleed area with 220-grit sandpaper, wipe away dust, and touch up with a small brush and the correct wall color. Apply thin coats and let each one dry before assessing if another is needed.
Related Topics: